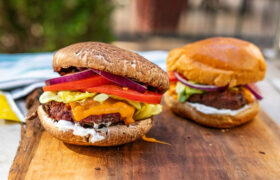


I’ll admit I’ve been a bit intimidated to even attempt roasting a whole turkey. But just like many things in life, I was overcomplicating it and not realizing it’s the exact same procedure for other roasted chicken recipes I’ve made, like this Peruvian-inspired pollo asado, and herb roasted spatchcock. The same steps as turkey – cooking is just (a lot) longer due to the size.
Smoking a turkey can feel daunting, but it’s a rewarding process that produces tender, flavorful meat with a crispy exterior. Paired with the technique of dry brining, your turkey will become a show-stopping centerpiece for any meal. In this guide, we’ll walk you through the steps to smoke a turkey, including dry brining tips, choosing the right turkey, and smoking methods. Let’s dive in!
How Long to Smoke a Turkey?
The time it takes to smoke a turkey depends on several factors, including its size, the temperature of the smoker, and whether it’s stuffed. Generally, a turkey takes about 30 to 40 minutes per pound at a smoker temperature of 225°F to 250°F. For a 12-pound bird, this equates to roughly 6 to 8 hours.
Factors Influencing Smoking Time:
- Turkey Size: Larger turkeys take longer to cook.
- Smoker Temperature: Maintaining a consistent temperature is crucial.
- Stuffed vs. Unstuffed: Stuffed turkeys take longer to reach the safe internal temperature of 165°F.
- Smoking Method: Whether you use a pellet grill, traditional smoker, or other methods can affect the duration.
Use a meat thermometer to monitor the internal temperature for perfect results. Consistent monitoring ensures that the meat stays juicy without overcooking.
How to Choose a Turkey?
Selecting the right turkey is essential for achieving the best flavor and texture. Here’s what to look for:
- Size: Aim for a turkey weighing between 10 to 14 pounds for even cooking. Larger turkeys are harder to smoke evenly and may require advanced preparation techniques.
- Fresh vs. Frozen: Fresh turkeys offer better texture, but frozen ones work well if properly thawed. Ensure you allow enough time for thawing—approximately 24 hours for every 5 pounds of turkey in the refrigerator.
- Natural or Organic: Opt for turkeys without added solutions or injections to control the seasoning. These turkeys absorb brines and seasonings better, ensuring maximum flavor.
Skin Quality: Ensure the skin is intact to lock in juices during cooking. The quality of the skin also contributes to achieving the ideal crispy exterior.
Different Methods of Smoking a Turkey
Smoking a turkey offers various approaches depending on the tools and ingredients you use. Below are some popular methods:
Olive Oil Mayonnaise
Using olive oil mayonnaise instead of butter creates a flavorful and moist turkey. It bastes the bird while cooking, ensuring a juicy interior and crispy skin. Simply mix spices with olive oil mayonnaise and rub it under and over the turkey’s skin. This method is especially helpful for enhancing the overall texture of the meat.
Butter for Roasting
Traditional recipes use butter as a binder for seasoning and crisping the skin. While effective, it has higher saturated fat content compared to olive oil mayonnaise. Butter provides a rich, traditional flavor but may not suit those aiming for a lighter meal.
Pellet Grill
Pellet grills provide consistent heat and smoky flavor. Preheat the grill to 225°F, place the turkey inside, and let the grill’s automated system maintain the temperature throughout the cooking process. Pellet grills are ideal for beginners due to their ease of use and reliable temperature control.
Turkey in a Smoker
A classic smoker offers intense smokiness. Ensure the smoker stays between 225°F and 250°F, and use a water pan to maintain moisture. Adding aromatics like rosemary sprigs or citrus peels to the water pan can further enhance the flavor profile.
Olive Oil Mayonnaise vs Butter for Roasting
The majority of recipes you’ll find on the internet and even cookbooks involve using butter as a binder for seasoning chicken or turkey. The butter is supposed to flavor and moisten the turkey when rubbed underneath the skin, as well as help get the skin crispy and golden brown, like a magazine shot.
Did you know that mayonnaise functions the same way? Mayonnaise bastes the turkey throughout the cooking process so the turkey maintains it’s natural juices and is seasoned by the continual basting of the mayonnaise mixture.

Here are 4 Reasons Why I Prefer to Use Olive Oil Mayonnaise:
Lower Saturated Fat Content
Olive oil mayonnaise has a significantly lower saturated fat content. As you may know, consuming a lot of foods high in saturated fats can build (LDL) cholesterol in blood vessels which leads to heart-related issues. Alternatively, olive oil mayonnaise contains heart-healthy monounsaturated fats that support cardiovascular health.
Rich in Healthy Fats
Since olive oil is the primary ingredient in olive oil mayonnaise, you can reap the health benefits. The monounsaturated fatty acid in olive oil can aid in the absorption of fat-soluble vitamins and antioxidants.
(Note: this is NOT to say one should consume large amounts of olive oil mayonnaise; nor am I saying you will get a significant amount of heart healthy fat just by consuming. I’m only saying that consuming foods that are more heart-healthy, you reduce the likelihood of heart related diseases.)
Moist Interior and Crispy Exterior
Using olive oil mayonnaise bastes the turkey which enhances the flavor (especially when you mix with spices) and keeps it moist on the inside. And while the turkey is naturally basting with the mayonnaise, the mayonnaise helps the skin to get crispy because of its high smoke point.
It’s Versatile
Using olive oil mayonnaise is suitable for various turkey cooking methods, including roasting and rotisserie. The high smoke point makes it perfect to toss on the grill for smoking for long periods of time.
OK, now let’s talk about dry brining turkey

There’s wet brine when you submerge the poultry in salted water, and dry brine when you rub salt all over the bird, inside (underneath the skin) and outside. Wet brining can take as little as 12 hours, whereas dry brining takes at least 24 hours, max 48 hours.
Yet still, I strongly prefer dry brining.

Here are my top 3 reasons why I prefer to dry brine poultry:
Preserves Natural Juices
Dry brining is coating the turkey with kosher salt (and seasonings, recommended) and allowing it to sit in the refrigerator. Since no additional moisture has been introduced, it preserves the natural juices, which is impossible with wet brining.
Concentrates Flavor
Dry brining enhances and concentrates flavor since it draws out moisture from the turkey, allowing the seasoning to penetrate deeper into the meat. This results in a more flavorful and less diluted taste.
Makes Crispier Skin
Dry-brined turkey and poultry tend to have crispier skin because the salt draws out excess moisture from the skin which allows for better browning during roasting or smoking, or even rotisserie cooking.
These are my 2 top tips – using olive oil mayonnaise and the dry brining method – to get flavorful, juicy poultry. And since turkey has a LOT more lean white meat, following these steps to get it as moist as possible is important…after all, no one wants dry meat that tastes like death.
Ok, now on to the fun part – my easy walkthrough on:
How to Smoke a Turkey That’s Juicy and Tender
Achieving a juicy, tender turkey requires careful preparation and smoking techniques. Follow these steps:
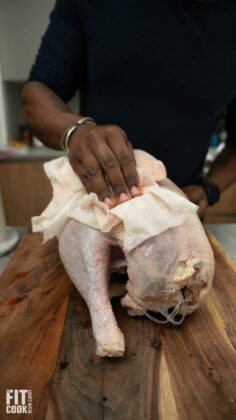
Step 1: Dry the Turkey
Pat the turkey dry with paper towels to prepare it for dry brining and seasoning. A completely dry surface ensures the brine adheres properly.


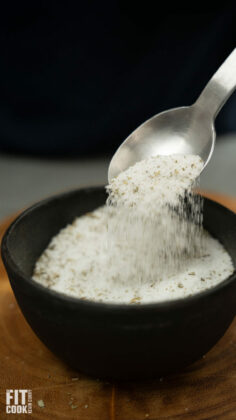
Step 2: Dry Brine the Turkey
Rub kosher salt (about 1 tablespoon per 4 pounds of turkey) all over the bird, including under the skin. Add dried herbs like rosemary and sage for extra flavor. Let the turkey rest uncovered in the refrigerator for 24 to 48 hours. This extended brining period maximizes flavor penetration.

To determine how much salt to use, a general rule of thumb is to use 1 tablespoon of kosher salt for every 4 lbs.
Note: I HIGHLY recommend using kosher salt since it’s crumbly, spreads, and does not clump like fine salt.
I like to mix in dried herbs like rosemary and sage for extra flavor. You can use fresh herbs if desired as well, just make sure they are finely chopped.
TIP: remember to gently pull back the skin to get under the skin as well. It’s a step a lot of people miss. This will draw out even more moisture from the skin so it gets crispy.
Allow this to rest UNCOVERED in the fridge for at least 24 hours but up to 48 hours.

After dry brining, it should look dry and you should be able to see meat through the skin so it looks pink and brown.
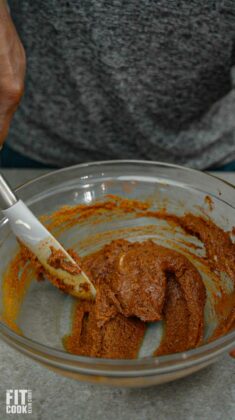
Step 3: Prepare the Spice Blend
Mix olive oil mayonnaise with spices such as paprika, cumin, garlic powder, and oregano. Adjust quantities based on your turkey’s size. Consider adding a touch of cayenne pepper for a hint of spice.
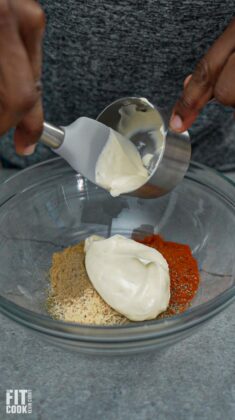
For my 14lb turkey, I used the following:
- 2 tablespoons dried herbs (oregano)
- 1.5 tablespoons cumin
- 2.5 tablespoons smoked paprika OR chili powder
- 1 tablespoon garlic powder
- 1/2 hefty cup olive oil mayonnaise
Mix everything together.
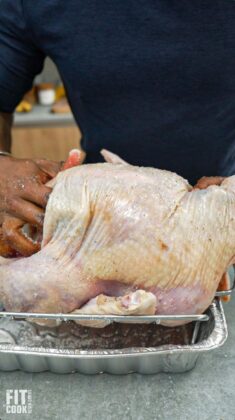
Step 4: Season the Turkey
Rub the spice blend over and under the skin. Ensure every part of the turkey is evenly coated to guarantee consistent flavor.
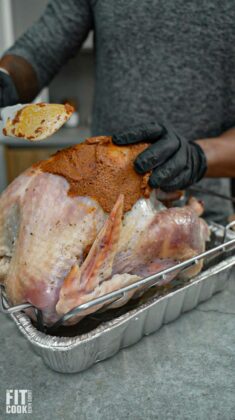
Rub the seasoning blend inside and outside, ensuring you get underneath the skin as well. A rule of thumb for me is to make sure my fingers can touch if I’m seasoning from both ends.

BE GENTLE – try not to tear the skin.
Fill the cavity with aromatics like carrots, celery, onions, lemons, and fresh herbs. The steam generated from these ingredients enhances the meat’s flavor.
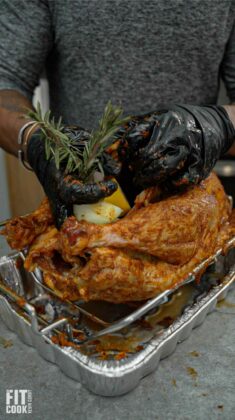
Let the turkey rest for at least 20 minutes on the counter to come to room temperature as much as possible. This will greatly assist in even cooking.
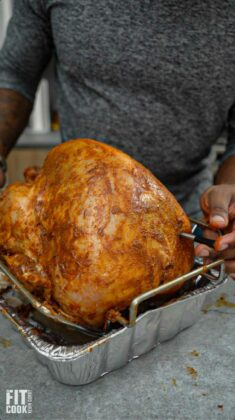
TIP: use a meat thermometer. Unless you’re very well seasoned in roasting meats, I highly recommend using a meat thermometer to help you keep track of the temperature inside the turkey so you know when it is finished. Insert it into the thickest part, the top of the breast.

Step 5 Preheat the Smoker
Set your smoker to 225°F and add wood chips or pellets. Popular wood choices include apple, cherry, or hickory for a rich, smoky flavor. If you prefer a milder flavor, alder wood is an excellent alternative.

Depending on the size of the turkey and how well you control the temperature, you can expect a 14lb turkey to smoke for about 3.5 – 5 hours. The slow cooking and lower temperature help ensure the turkey is not drying out due to excess heat.

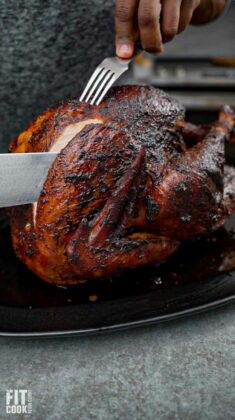
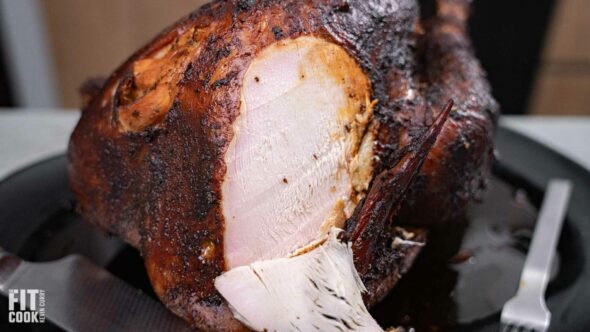
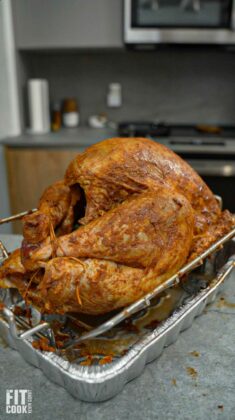
Place the turkey in the smoker and monitor its internal temperature. Remove it when the thickest part of the breast reaches 165°F and the thighs reach 175°F. Rest the turkey for at least 20 minutes before carving to allow juices to redistribute.


Step 6 Smoke the Turkey
Let it rest on the counter and use a foil to create a tent around it. Keep in mind that the turkey is still cooking on the inside so the temperature should come to 160F – 165F.
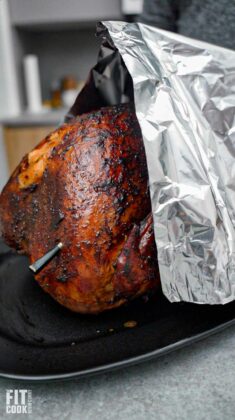
Remove the thermometer.
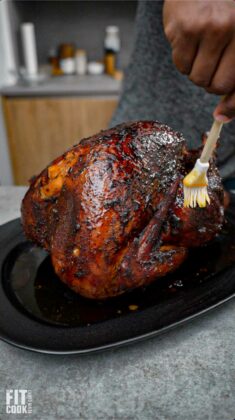
Step 7 Baste the Turkey
Baste the turkey with the natural juices.
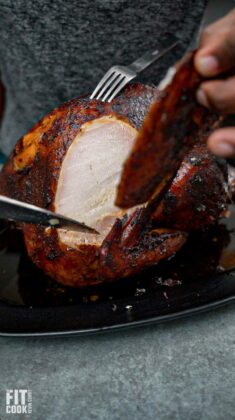
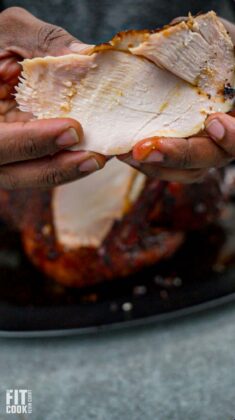
Slice and enjoy!

Frequent Questions for Smoking a Turkey
Should I Brine My Bird?
Yes, dry brining enhances flavor and preserves natural juices, resulting in a moist turkey. It’s a simple yet effective method that elevates your dish.
Do I Need to Remove the Wishbone?
Removing the wishbone makes carving easier but is optional. If presentation matters, leave it intact.
Should I Use Natural Hardwood Instead of Briquettes?
Natural hardwood provides a cleaner smoke flavor compared to briquettes. It also avoids potential chemical residues found in some briquettes.
What Kind of Wood Is Best?
Fruity woods like apple or cherry are ideal for turkey, while hickory adds a stronger, smoky flavor. Combining woods can create unique flavor profiles.
How Much Smoked Turkey Per Person?
Plan for about 1 to 1.5 pounds per person, depending on side dishes and leftovers. For larger gatherings, consider smoking two smaller turkeys for even cooking. Smoking and dry brining a turkey is a rewarding process that yields flavorful, tender meat with a perfect balance of smokiness and seasoning. Follow these steps for a foolproof, crowd-pleasing result!